Wearing a firefighter uniform is not just about putting on protective gear. It’s about representing a department, a team, and a responsibility that very few people truly understand.
And while most people focus on helmets, jackets, and boots, there’s one detail that often gets overlooked, but matters just as much. Patch placement.
The correct position of patches on a uniform shows an individual’s discipline and professional identity and their commitment to their work. The process will be explained to you in its basic form which will help you achieve success on your first attempt.
Firefighter Uniform Patch Placement Guide: Rules, Positions, and Compliance Tips
The firefighter uniform represents more than just a clothing item because it serves as an entire visual system.
Every patch tells a story:
- Who you are
- Where you serve
- What you’ve earned
And placement? The story becomes readable because of that particular element. The correct placement of patches results in an appearance that is sharp and organized and professional. The situation creates confusion when the patches are not used.
Why Patch Placement Matters More Than You Think
Before we get into positions and rules, let’s understand why this matters so much.
Identity and Recognition
When firefighters respond to emergencies, people look for clarity.
They want to know:
- Who is in charge
- Which department is present
- Who to approach
Properly placed patches make identification quick and easy, even in chaotic situations.
Professional Appearance
A uniform isn’t just about safety, it’s about presentation.
Consistent patch placement:
- Builds trust with the public
- Reflects discipline within the department
- Shows attention to detail
Internal Structure and Rank Visibility
Patches often indicate:
- Rank
- Unit
- Special roles
If they’re placed incorrectly, it can lead to confusion within the team itself.
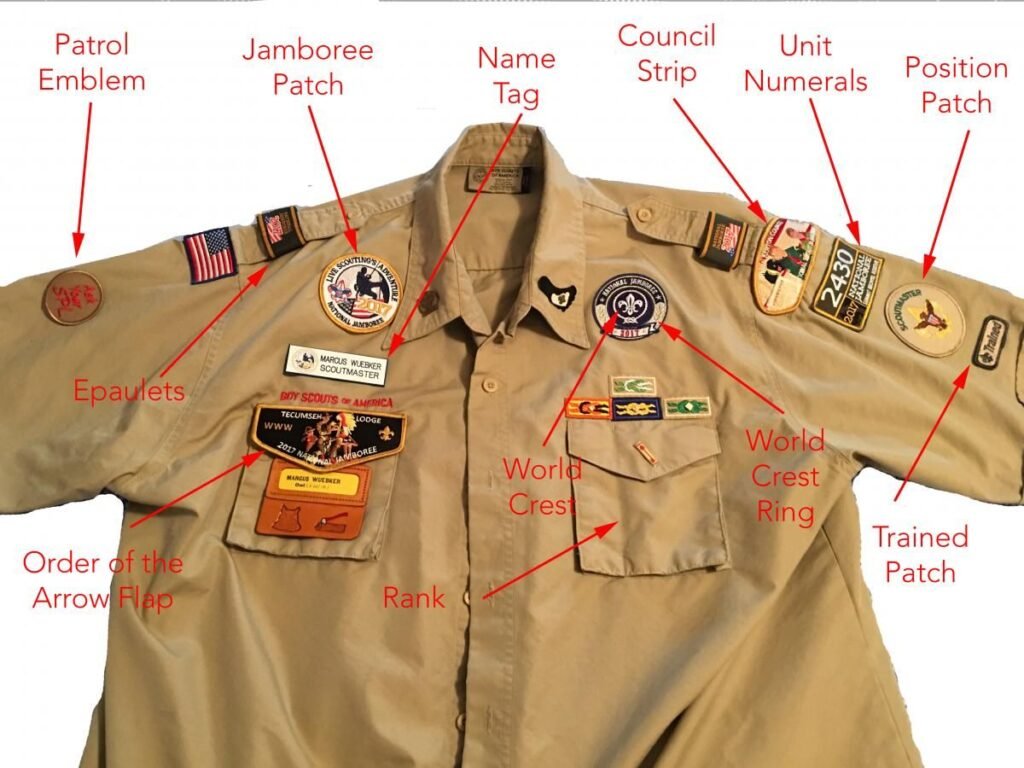
Understanding Standard Patch Positions
Every department certainly has its own policy, though the fire service sees some universal norms followed by the majority of departments across the board. Let’s make that rather simple.
Shoulder Patches (Department Patch)
This is the most recognizable patch on a firefighter uniform.
Where It Goes:
- Typically on the upper sleeve
- Positioned about 1 to 2 inches below the shoulder seam
Placement Tips:
- Center the patch on the sleeve
- Keep it aligned on both sides
Why It Matters:
This patch represents your department. It should always be clearly visible and properly aligned.
Chest Patches (Name and Role)
These are smaller patches but equally important.
Name Patch
Placement:
Usually on the right chest
Purpose:
Helps team members and civilians identify the firefighter quickly
Department or Unit Patch (Front)
Placement:
Typically on the left chest
Purpose:
Displays department name, station, or logo
Flag Patches (If Applicable)
Some uniforms include a national or regional flag.
Standard Position:
Upper sleeve, often above or below the department patch
Important Detail:
Flags are always placed in a manner as if moving forward hence they have been the symbolism of progress.
Rank Insignia
Rank is not always shown through patches, but when it is, placement matters.
Common Placement:
- Collar
- Chest area
- Shoulder tabs
Key Tip:
Always follow department-specific guidelines for rank placement, as this varies more than other patches.
Specialty or Certification Patches
These may include:
- Rescue team
- Hazmat
- EMS certification
Placement:
- Lower sleeve
- Below the main shoulder patch
Rule of Thumb:
Never overcrowd the uniform. Keep it clean and readable.
Creating Consistency Across the Department
Here’s where many departments struggle. You might have the right patches—but inconsistent placement. And that creates a problem.
Standardize Measurements
Don’t rely on “eye judgment.”
Instead:
- Define exact distances (e.g., 1.5 inches below seam)
- Share a visual guide with all personnel
Provide a Reference Template
Create a simple layout showing:
- Exact patch positions
- Spacing guidelines
This ensures every uniform looks the same, no matter who is wearing it.
Train New Recruits
Patch placement should be part of onboarding.
Show them:
- Where each patch goes
- Why it matters
When people understand the reason, they’re more likely to follow it correctly.
Compliance Tips Procurement Coordinators Should Know
If you’re handling uniform procurement, your role is critical. You’re not just ordering patches, you’re ensuring compliance.
Confirm Department Regulations
Every department may have slight variations.
Before placing orders:
- Review official uniform policies
- Confirm patch sizes and positions
Order the Right Sizes
Incorrect patch size can throw off placement.
Too large:
- Looks bulky
- Doesn’t fit standard positions
Too small:
- Reduces visibility
Choose the Right Backing
Placement is affected by how patches attach.
- Sew-on: Permanent and stable
- Velcro: Flexible but must align properly
Make sure the attachment method supports consistent placement.
Maintain Uniformity in Reorders
When reordering patches:
- Use the same supplier
- Match previous specifications
Even minor variations in size or color create an impact on the total visual uniformity.
Common Patch Placement Mistakes (And How to Avoid Them)
Team members who have expertise still commit errors. The most frequent errors that teams make, along with their solutions, are provided here.
Uneven Shoulder Placement
Problem:
One patch sits higher than the other.
Solution:
Use measurement guidelines instead of guessing.
Crooked Alignment
Problem:
Patch tilts slightly to one side.
Solution:
Always align with the sleeve seam as a reference point.
Overcrowding the Uniform
Problem:
Too many patches in one area.
Solution:
Stick to essential patches only. Keep it clean.
Inconsistent Spacing
Problem:
Different firefighters have different spacing.
Solution:
Standardize and document exact measurements.
Seasonal and Gear-Based Variations
Firefighter uniforms aren’t always the same.
You may have:
- Station uniforms
- Turnout gear
- Jackets
Each may require slight adjustments.
Jackets and Outerwear
Patches should remain:
- Visible
- Consistent with standard placement
Even if spacing changes slightly, alignment should remain uniform.
Tactical Gear
Velcro patches are common here.
Make sure:
- Placement zones are clearly defined
- Patches don’t overlap or shift
How Proper Patch Placement Builds Pride
This might sound small, but it’s not. When a firefighter puts on a uniform where:
- Every patch is aligned
- Every detail is consistent
- Every symbol is clear
It creates a sense of pride.
It says:
“This is who we are. And we take it seriously.”
And that mindset carries into the work they do every day.
Final Thoughts
Patch placement rules require compliance with specific regulations. The process requires officers to show respect for three things: the uniform, the police department, and the individuals who wear the uniform. Your responsibilities as procurement coordinator extend to activities that include ordering supplies.
You’re helping create a standard. You’re ensuring consistency. You’re protecting the identity of your department.
So take the time to:
- Understand placement guidelines
- Standardize across the team
- Work with reliable suppliers
Because in the end, a well-placed patch does more than complete a uniform. It tells a story, clearly, proudly, and without confusion.